Thursday, 6 December 2007
Saturday, 27 October 2007
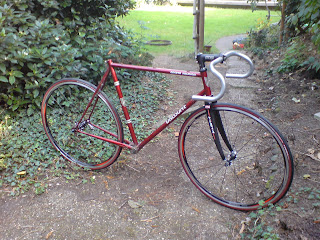
Ready to ride!
So the last few things went on - brakes and cables, bar tape and the saddle. After taking two weeks to find the time, it was all done in no time at all today. So I took a quick spin around the streets and into the park.

First impression? It's great - a super smooth ride and almost silent as you churn along. The simplicity of the drivetrain is really noticeable in its lack of drag and whine.
A few more pics...


So what now? Well, to ride it lots, I suppose - have to put brackets on for lights and maybe a computer too, though it seems a shame to clutter up the bars with all that. Then I have to start looking for the next project...
Thursday, 18 October 2007
Undersize BB shell
By the way, one further small snag (surely not the last) was that when I came to install the new BB, I discovered that the shell was in fact only about 65mm, rather than the standard 68mm. Of course with the old adjustable 3-piece cup & cone bearings, this was easy enough to accommodate, but with unadjustable cartridge bearings it simply didn't fit. So now I have the old BB lock-ring serving as a spacer. Perfect!
Wednesday, 17 October 2007
Almost there!
A bit of a quiet time on the bike front - the aforementioned wardrobe building taking precedence. I did however get out to the Ripley Cycle Jumble last weekend where I picked up the last few bits - a nice new Selle San Marco Rolls saddle, an old Italian seat post and some bar tape. With a bit of luck I might just get it together this weekend....
Saturday, 6 October 2007
A bit of a grind
 Here you can see the obstructed BB shell.
Well, I decided to tidy up the rather messy joints the Viscount frame builder left inside the BB shell. A quick post on the London Fixed Gear & Single Speed forum to see if anyone else had encountered the same clearance problem gave me the reassurance I needed, so today I took to the tube-ends with my Dremel grinder.
In about 5 minutes I had cleared the way.

From there, it was a quick job to install the new BB, chainset, chain and pedals. With the light fading fast (Autumn is well and truly upon us) I managed to put in a few laps of the garden. No brakes yet and no saddle, so standing room only, but it was great to turn the pedals.

Monday, 1 October 2007
BB Snag

Most of the remaining parts arrived in the mail and so I thought I'd take it a little further on Sunday evening. On of the upgrades is to switch from the old cone & cup bottom bracket to a modern sealed cartridge bearing like this.
Low maintenance, weather-proof, etc. But what I hadn't bargained for is that the down tube, seat tube and chainstays intrude into the middle of the Viscount's BB shell where they're brazed in. It's a bit of lazy framebuilding really; the joints could have been much more neatly finished internally, but then of course there was no need to waste time on this as the original axle has acres of clearance around it in the middle. The cartridge bearing on the other hand is a fairly close fit. Hmm. Currently considering the next move. I think it might be Dremel time, to grind off just a wee bit of the offending protrusion to make a little more room.
For now, though, construction work has been temporarily halted. (That's also something to do with the new wardrobes which I'm supposed to be fitting, instead of 'playing' with my bike).
Saturday, 29 September 2007
Wheels on
...and so to put the wheels and handlebars on.


Next: the search for a chainset and bottom bracket.


Next: the search for a chainset and bottom bracket.
Assembly begins

With the steerer cut and filed, it was time to start putting the bits together. After whacking the star-fangled nut into the steerer tube (using a sacrificial coach bolt, a hammer and a bit of hitting and hoping), I was able to get the forks onto the frame, giving the first sense of what the new machine is going to look like.
So far so good! I think that the fatter blades of the carbon forks together with the modern styling of the stem gives it a more muscular look.
I couldn't wait to get it looking more bike-like, so I chucked a few more bits on. I'm re-using the original bars, so I gave these a serious clean-up to get rid of the old bar tape gunk.


Tuesday, 25 September 2007
Steerer cutting

After putting it off for quite a while, I decided it was finally time to cut the steerer tube on the new forks. I was slightly apprehensive about this, as it's one of those things where you can't really afford to get it wrong. I'm putting in a couple of spacers to raise the handlebar height a little, so in theory there's soem margin for error.
As the old saying goes, "measure twice, cut once". Or in my case, measure four times, go away and think about it, measure again, put it off until next weekend.... There is also the question of finding the best tool for the job. A hacksaw with a nice new well-fitted blade is probably ideal, with some kind of guide to ensure a straight cut. A bit like that old mitre saw lying around in the shed, I thought - never mind that the blade is designed for wood. It went through like a knife through... well actually like a wood saw through alloy, really.
After making the cut, I remembered what it was I hated about metalwork O level. Filing. Such a tedious and unrewarding occupation. The only good thing about filing was having the opportunity to get your teacher to say 'bastard' ("hur hur, Sir said bastard").
Saturday, 22 September 2007
Piece by piece
So, a bit of a catch-up required...
Since disassembling the bike at the end of August, I have been gradually accumulating the parts to put it back together.
There were a few key decisions along the way, some of which were driven by the old (obsolete) frame spacing. The original forks were 95mm and the rear drop-outs 125mm over lock-nuts (compared with today's 100mm and 130mm). Flexing the frame to squeeze an extra 5mm at the rear is easy enough, but I wasn't happy about the idea of spreading the forks. That leaves 2 options: rebuild the front wheel on the original hub or replace the forks. I chose the latter - it seemed by far the better option to update to modern hubs. Having decided to replace the forks, I also elected to switch from threaded to unthreaded headset, to bring the bike more up to date.
So to eBay to pick up the first few items:
- ITM Visia carbon forks
- M-Part 1" headset
- ITM Big One stem
The raw material

There it is - straight from the shed. This was taken on August Bank Holiday weekend just before I got started. An hour or so later, I had it stripped down to a bare frame, a box of bits and a big bag of junk.
Friday, 21 September 2007
It starts here!
So what's it all about?
My latest 2-wheeled project: turning a 30 year old Viscount Aerospace road bike into a single-speed London-style rapid commuter machine to use for my daily ride between Kingston and the City.
Why? (a) Because it was languishing in the shed looking sad & neglected, (b) because I've bought too many new bikes but still crave a novelty, and (c) because I needed a project.
More to follow, starting with some "before" pics...
Subscribe to:
Posts (Atom)